Search This Blog

Friday, 25 October 2024

Experiment - 24 :- How To Install A Sound Card

Aim :- How To Install A Sound Card 

Tools Needed:

  • Phillips screwdriver
  • Anti-static wrist strap (optional, but recommended)


Steps:

  1. Prepare Your Computer:

    • Shut down your computer and unplug it from the power source.
    • Open the case by removing the screws or sliding off the side panel.
  2. Locate the PCI/PCIe Slot:

    • Identify an available PCI or PCIe slot on your motherboard. The slot is usually located near the back of the case.      

  3. Remove the Slot Cover:

    • If there’s a metal cover over the slot, remove it by unscrewing it or bending it slightly to break it off.
  4. Insert the Sound Card:

    • Align the sound card with the slot and press it down firmly but gently until it’s securely in place. Make sure the card's connectors are seated properly in the slot.
  5. Secure the Sound Card:

    • Use a screw to secure the sound card to the case, if applicable.
  6. Reconnect Everything:

    • Replace the side panel of the case and screw it back into place.
    • Plug your computer back in and turn it on.
  7. Install Drivers:

    • Once the computer boots up, install the drivers for your sound card. You can usually find these on the manufacturer’s website or on the CD that came with the card.
  8. Configure Audio Settings:

    • Go to your computer’s sound settings to configure your new sound card and select it as the default playback device.

Thursday, 24 October 2024

EXPERIMENT- 23 :- HOW TO REPLACE PROJECTOR LAMP

AIM :-  HOW TO REPLACE PROJECTOR LAMP

Replacing a projector lamp is a straightforward process, but it’s important to follow the steps carefully to ensure safety and proper installation. Here’s a step-by-step guide along with a simple diagram to help you visualize the process.

Tools Needed

  • Screwdriver (typically Phillips)
  • Replacement lamp (make sure it's compatible with your projector)
  • Soft cloth or gloves (to handle the lamp safely)

Steps to Replace a Projector Lamp


1. Safety First

  • Turn off the projector and unplug it from the power outlet.
  • Allow the projector to cool down for at least 30 minutes if it was recently used.

2. Remove the Lamp Cover

  • Locate the lamp access door, usually on the bottom or side of the projector.
  • Use a screwdriver to remove any screws securing the cover.
  • Carefully lift off the lamp cover.

3. Disconnect the Old Lamp

  • Identify the lamp assembly. It is usually secured by screws or a latch.
  • Remove the screws (if any) that hold the lamp in place.
  • Carefully pull the lamp out of the projector. Be cautious, as the lamp may still be hot if recently used.


4. Install the New Lamp

  • Take the new lamp out of its packaging, handling it by the edges. Avoid touching the glass portion with your fingers.
  • Align the new lamp with the connectors in the projector and gently insert it into place.
  • Secure the lamp with screws or latches as required.

5. Replace the Lamp Cover

  • Put the lamp cover back on the projector and secure it with screws.

6. Reset the Lamp Timer (if necessary)

  • Some projectors require a reset of the lamp timer after replacing the lamp. Refer to your projector’s manual for instructions on how to do this.

7. Test the Projector

  • Plug in the projector and turn it on.
  • Check that the image is clear and that the projector functions normally.

EXPERIMENT - 22 :- HOW TO REPAIR LCD PROJECTORS

 AIM  :-  HOW TO  REPAIR  LCD PROJECTORS

Tools Needed

  • Screwdriver set
  • Plastic prying tools
  • Replacement bulbs (if necessary)
  • Compressed air canister
  • Multimeter (for power issues)
  • Anti-static wrist strap (optional)

Steps to Repair an LCD Projector


1. Safety First

  • Unplug the projector and let it cool down completely.
  • Allow at least 30 minutes for the lamp to cool if it was recently used.

2. Open the Projector Case

  • Remove the screws securing the outer casing of the projector.
  • Use plastic prying tools to carefully detach the casing without damaging the clips.

3. Check the Lamp

  • Locate the lamp assembly inside the projector.
  • If the lamp appears burnt out (blackened or broken), replace it with a new one. Follow the manufacturer's instructions for replacing the lamp.

4. Clean the Internal Components

  • Use compressed air to blow out dust from the lamp housing, cooling fans, and internal components.
  • Avoid touching the lenses and sensitive parts with your fingers.

5. Inspect and Test Cables

  • Check all internal connections, ensuring that cables are secure and undamaged.
  • If you're experiencing power issues, use a multimeter to test the power supply and connections.

6. Check the LCD Panels

  • Inspect the LCD panels for any signs of damage or misalignment.
  • If they appear misaligned, gently adjust them back into place.
  • For color issues, ensure the panels are clean and securely connected.

7. Reassemble the Projector

  • Carefully put the casing back together, ensuring all components are aligned and seated properly.
  • Replace screws and secure the outer casing.

8. Test the Projector

  • Plug in the projector and turn it on.
  • Check the image quality and functionality. Adjust settings as needed.

Common Issues and Fixes

  • Dim Image: Replace the lamp or clean the filters.
  • Overheating: Ensure proper airflow and clean dust from vents and fans.
  • No Image: Check connections, reset the projector, or test with a different source device.
  • Color Problems: Inspect and clean LCD panels; ensure proper alignment.

EXPERIMENT - 21 :- MONITOR TROUBLESHOOTING

AIM :- MONITOR TROUBLESHOOTING

Troubleshooting a computer monitor involves identifying and resolving issues that may affect its performance. Here are some common problems and their solutions:


1. No Power

  • Symptoms: Monitor does not turn on; power light is off.
  • Solutions:
    • Check if the monitor is plugged in and the power cable is securely connected.
    • Ensure the outlet is working by testing it with another device.
    • Look for a power switch on the monitor; it may be turned off.
    • If the power light is flickering, the power supply might be faulty.

2. No Display (Black Screen)

  • Symptoms: The monitor is powered on, but the screen remains black.
  • Solutions:
    • Check if the monitor is set to the correct input source (HDMI, VGA, etc.).
    • Ensure the video cable is securely connected to both the monitor and the computer.
    • Test with a different video cable to rule out cable issues.
    • Connect the monitor to another computer to see if the issue persists.

3. Flickering Screen

  • Symptoms: The display flickers or appears unstable.
  • Solutions:
    • Check for loose or damaged cables.
    • Adjust the refresh rate in your computer’s display settings (try 60Hz or 75Hz).
    • Update the graphics drivers to the latest version.
    • Move any electronic devices that might interfere with the monitor (e.g., speakers).

4. Distorted or Blurry Image

  • Symptoms: Text and images appear unclear or distorted.
  • Solutions:
    • Adjust the resolution in display settings to match the monitor’s native resolution.
    • Check if the monitor’s settings have been misconfigured (e.g., sharpness, contrast).
    • Test the monitor with a different computer to rule out graphics card issues.

5. Color Issues

  • Symptoms: Colors appear incorrect or one color is dominant.
  • Solutions:
    • Check cable connections; a loose cable can cause color distortion.
    • Reset the monitor to factory settings through its on-screen menu.
    • Test the monitor with another computer to see if the issue persists.

6. Dead Pixels

  • Symptoms: Small, fixed dots on the screen that do not change color.
  • Solutions:
    • Use software to try to "revive" dead pixels by cycling colors rapidly.
    • If the monitor is under warranty, consider contacting the manufacturer for repair or replacement.

7. Screen Resolution Problems

  • Symptoms: The screen displays incorrectly, with parts cut off or not displaying.
  • Solutions:
    • Right-click on the desktop, go to display settings, and adjust the screen resolution.
    • Ensure that the graphics drivers are updated to support your monitor’s resolution.

8. Overheating

  • Symptoms: Monitor shuts down unexpectedly; excessive heat is noticeable.
  • Solutions:
    • Ensure proper ventilation around the monitor.
    • Clean any dust buildup from the vents and internal components (if applicable).
    • Avoid placing the monitor in direct sunlight or near heat sources.


EXPERIMENT - 20 :- HOW TO REPAIR LCD MONITOR .

AIM :- HOW TO REPAIR LCD MONITOR .

Repairing an LCD monitor can be a complex task, but with careful attention to detail and safety, you can address common issues like a cracked screen or power problems. Here’s a step-by-step guide for a basic repair, such as replacing a cracked screen.

Tools Needed

  • Screwdriver set
  • Plastic prying tools
  • Replacement LCD panel
  • Multimeter (optional for power issues)
  • Anti-static wrist strap (optional)
Procedure

Steps to Repair an LCD Monitor

1. Safety First

  • Unplug the monitor and any connected devices.
  • Let it sit for a few minutes to discharge any residual power.

2. Open the Monitor Case


  • Use a plastic prying tool to gently separate the front bezel from the monitor case.
  • Be cautious not to damage the clips or the screen.

3. Remove Screws

  • Once the bezel is off, locate and remove any screws holding the LCD panel in place. These are usually at the corners of the screen.

4. Disconnect Cables

  • Carefully lift the LCD panel out.
  • Disconnect the video and power cables from the back of the panel. Note the orientation for reassembly.

5. Replace the LCD Panel


  • Position the new LCD panel in the frame.
  • Reconnect the video and power cables securely.

6. Reassemble the Monitor


  • Secure the LCD panel with screws.
  • Snap the front bezel back into place, ensuring all clips are properly engaged.

7. Test the Monitor

  • Plug the monitor back in and power it on to check for functionality.
  • If it powers on correctly, you’ve successfully completed the repair.


Common Issues and Fixes

  • No Power: Check power connections and cables. Use a multimeter to test the power supply.
  • Flickering Screen: This could be due to a loose connection or faulty inverter. Recheck connections.
  • Distorted Image: May indicate issues with the graphics card or internal connections.

EXPERIMENT - 19 :- Installing A Graphics Card

AIM  :-   Installing A Graphics Card 

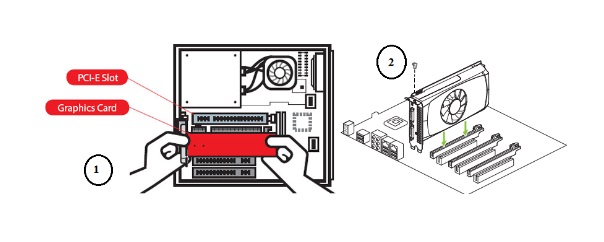
It can enhance your computer's performance, especially for gaming and graphic-intensive tasks. Here’s a step-by-step guide, including a simple diagram to help visualize the process.

Tools Needed

  • Phillips screwdriver
  • Anti-static wrist strap (optional but recommended)

Steps to Install a Graphics Card

1. Prepare Your Workspace

  • Turn off your computer and unplug all cables.
  • Move to a clean, static-free workspace.

2. Open the Computer Case

  • Remove screws or thumb screws from the side panel of the case.
  • Slide off the panel to expose the internal components.


3. Locate the PCI Express Slot

  • Identify the PCI Express (PCIe) slot on your motherboard (usually the longest slot).

4. Remove Expansion Slot Covers

  • Depending on your case, you may need to remove metal covers on the back of the case corresponding to the PCIe slot.
  • Unscrew or unclip the cover to create space for the graphics card.


5. Insert the Graphics Card

  • Carefully align the graphics card with the PCIe slot and press down firmly until it clicks into place.
  • Ensure that the metal bracket of the card aligns with the back of the case.

6. Secure the Graphics Card

  • Use screws to secure the card to the case, ensuring it’s stable.

7. Connect Power Cables (if needed)

  • If your graphics card requires additional power, connect the appropriate power cables from your power supply.

8. Close the Computer Case

  • Replace the side panel and secure it with screws.

9. Reconnect Cables and Power On

  • Plug in all cables and power on your computer.

10. Install Drivers

  • Once booted, download and install the latest drivers for your graphics card from the manufacturer's website.

Diagram


Here's a simple diagram to illustrate the installation process:

Tips
  • Always handle components by the edges to avoid static damage.
  • Check compatibility of your graphics card with your motherboard and power supply before purchasing.
  • If you're unsure, consult your motherboard's manual for specific instructions.

APPRENTICESHIP IN I.F.F.C.O @ KALOL , GANDHINAGAR


Friday, 18 October 2024

INDUSTRIAL VISIT AT UNISON CONTROLS PVT. LTD.


UNISON CONTROLS PVT. LTD.

યુનિસન કંટ્રોલ્સ પ્રાવેટ લિમિટેડ.

165 A-D, Devraj Industrial Park , Piplaj-Pirana Road, Piplaj Near 200 Feet S.P. Ring Road, Kamod Cir, Ahmedabad, Gujarat 382405

DATE OF VISIT - 10/10/2024


Experiment-18:- Printer And Scanner Troubleshooting

 Aim :- Printer  And Scanner  Troubleshooting

1. Printer Won't Print

Steps:

  1. Check Power and Connections:

    • Ensure the printer is turned on (look for indicator lights).
    • Check that the power cable is securely plugged in.
    • For USB printers, ensure the USB cable is connected to both the printer and computer.
    • For network printers, check the Ethernet or Wi-Fi connection.
  2. Clear Print Queue:

    • Open Control Panel > Devices and Printers (Windows) or System Preferences > Printers & Scanners (Mac).
    • Right-click the printer and select See what's printing (Windows) or select the printer and click Open Print Queue (Mac).
    • Cancel any stuck print jobs.
  3. Restart Devices:

    • Turn off the printer and computer, then turn them back on.

2. Poor Print Quality

Steps:

  1. Check Ink/Toner Levels:

    • Open the printer software on your computer to check ink/toner levels.
    • Replace or refill cartridges if needed.
  2. Clean Print Heads:

    • Access printer maintenance options in the printer software.
    • Select the Print Head Cleaning option and follow the prompts.
  3. Print Test Page:

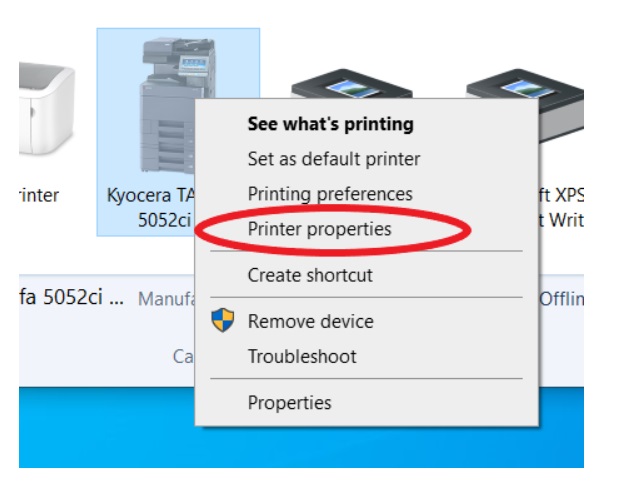
    • From the printer properties, select Print Test Page to check for improvement.

3. Printer Is Offline

Steps:

  1. Check Printer Status:

    • Make sure the printer is powered on and connected to the correct network.
  2. Set as Default Printer:

    • In Devices and Printers, right-click the printer and select Set as Default Printer.
  3. Restart Print Spooler:

    • Open Run (Windows + R), type services.msc, and press Enter.
    • Find Print Spooler, right-click, and select Restart.

4. Connectivity Issues

Steps:

  1. USB Connection:

    • Try using a different USB port on your computer.
    • If using a USB hub, connect directly to the computer instead.
  2. Wireless Connection:

    • Ensure the printer is connected to the correct Wi-Fi network.
    • Check signal strength and move the printer closer to the router if necessary.
  3. Firewall Settings:

    • Temporarily disable firewall/antivirus software and check if the printer connects.

Scanner Troubleshooting

1. Scanner Not Recognized

Steps:

  1. Check Connections:

    • Ensure the USB cable is securely connected or that the scanner is connected to the Wi-Fi network.
  2. Power Cycle:

    • Turn off the scanner, wait for a few seconds, then turn it back on.
  3. Restart Computer:

    • Restart your computer to refresh connections.

2. Poor Scan Quality

Steps:

  1. Check Resolution Settings:

    • Open the scanning software and ensure the resolution is set appropriately (e.g., 300 DPI for documents).
  2. Clean the Scanner Glass:

    • Use a soft, lint-free cloth and glass cleaner to clean the scanner bed.
  3. Perform Calibration (if applicable):

    • Access the scanner’s calibration feature through the software and follow the instructions.

3. Scanner Not Scanning

Steps:

  1. Check Drivers:

    • Go to the manufacturer’s website and download the latest drivers for your scanner model.
  2. Close Other Applications:

    • Ensure no other applications are trying to access the scanner simultaneously.
  3. Test with Different Software:

    • Try scanning using another application (e.g., Windows Fax and Scan or Image Capture on Mac).

4. Error Messages

Steps:

  1. Refer to Manual:

    • Check the user manual for specific error codes/messages and follow the troubleshooting steps provided.
  2. Reset Settings:

    • Look for a reset option in the scanner’s menu to restore factory settings.

Conclusion

By following these practical steps, you can effectively troubleshoot common issues with printers and scanners. If you encounter specific problems that aren’t resolved by these steps, feel free to ask for more targeted assistance!

Experiment-17:-Calibrating a Passbook Printer


Aim:- Calibrating a Passbook Printer

Step 1: Gather Materials

  • Passbook printer
  • Passbook for calibration
  • Computer with printer driver installed (if applicable)
  • Printer manual (for specific instructions)

Step 2: Prepare the Printer


  1. Turn On the Printer: Ensure the printer is powered on and ready.
  2. Load Passbook: Insert a passbook into the printer. Make sure it’s aligned properly according to the printer’s guidelines.

Step 3: Access Printer Settings

  1. Control Panel: Use the printer's control panel to navigate to the settings or maintenance section.
  2. Print Configuration Page: If available, print a configuration page to check the current settings and alignment.

Step 4: Adjust Print Alignment

  1. Test Print: Print a test page using the passbook.
  2. Check Alignment: Examine the printed test page to see if the text aligns correctly within the passbook.
  3. Adjust Settings: If alignment is off:
    • Go to the alignment settings in the printer’s menu.
    • Adjust the vertical or horizontal alignment as needed.

Step 5: Fine-Tune Print Quality

  1. Print Quality Settings: Access the print quality settings in the printer menu or through the computer’s printer properties.
  2. Adjust Settings: Modify settings like:
    • Print density
    • Draft or quality mode
    • Ink or ribbon settings (if applicable)

Step 6: Calibrate Print Head (if needed)

  1. Head Cleaning: If the print quality is poor, run a print head cleaning cycle through the printer’s maintenance menu.
  2. Test Print Again: After cleaning, print a test page to check if quality has improved.

Step 7: Save Settings

  • Once you’re satisfied with the alignment and print quality, save the settings. If the printer has a memory feature, ensure these adjustments are stored.

Step 8: Final Test Print

  1. Print a Full Passbook Entry: Execute a full print of a passbook entry to confirm everything is functioning correctly.
  2. Review: Check for proper alignment and print quality across the entire passbook.

Step 9: Document the Settings (Optional)

  • Keep a record of the calibration settings for future reference.

Experiment-16 :- Procedure for Installing a Multifunction Printer on a LAN


Procedure for Installing a Multifunction Printer on a LAN

Materials Needed

  • Multifunction printer
  • Ethernet cable (if applicable)
  • Access to the printer’s network settings
  • Computer (Windows or Mac)
  • Installation CD or access to the internet for downloading drivers

Step 1: Unbox and Set Up the Printer

  1. Unbox the Printer: Remove all packaging materials and protective tape from the printer.
  2. Position the Printer: Place the printer in a location where it can connect to the network easily (near a router if using Ethernet).
  3. Connect Power: Plug the printer into a power outlet and turn it on.


Step 2: Connect the Printer to the Network


  • For Wired Connection (Ethernet):
    1. Use an Ethernet cable to connect the printer to a LAN port on your router or switch.
  • For Wireless Connection:
    1. Access the printer's control panel.
    2. Navigate to the network settings.
    3. Select the Wi-Fi setup or wireless network option.
    4. Choose your Wi-Fi network from the list and enter the password.

Step 3: Install Printer Drivers and Software


  1. Using Installation CD:

    • Insert the installation CD into your computer’s drive.
    • Follow the on-screen instructions to install the necessary drivers and software.


  1. Downloading Drivers from the Internet:

    • Visit the manufacturer’s website.
    • Navigate to the support or download section for your printer model.
    • Download the latest drivers and software for your operating system.
    • Open the downloaded file and follow the installation prompts.

Step 4: Configure the Printer on Your Computer


  1. Windows:

    • Go to Settings > Devices > Printers & Scanners.
    • Click Add a printer or scanner.
    • Wait for the computer to detect the printer on the network.
    • Select the printer and click Add Device.
  2. Mac:

    • Go to System Preferences > Printers & Scanners.
    • Click the + button to add a printer.
    • Select the printer from the list and click Add.

Step 5: Test the Printer

  1. Print a Test Page:
    • Open a document or a test page from your computer.
    • Select the multifunction printer as the printer and print.
  2. Verify Functionality: Ensure that the printer is functioning correctly (printing, scanning, copying).

Step 6: Configure Additional Settings (Optional)

  • Access the printer settings through the software installed on your computer to adjust preferences like print quality, default paper size, etc.
  • For scanning, you may need to configure the scanner settings through the software to select the destination folder for scanned documents.


Practical - 13 :-To Install and configure Scanner to a computer system.

AIM: To Install and configure Scanner to a computer system.

Materials Needed

  • Scanner
  • USB cable (if applicable)
  • Power adapter
  • Computer (Windows or Mac)
  • Installation CD or access to the internet for downloading drivers

Procedure: 

Plug and Play installation: 

1. Plug your web camera or scanner into your computer. 

2. If your camera is Plug and Play, the Scanner and Camera Wizard starts.-or

3. Double-click Add Device. 

4. Follow the instructions on your screen To Install and configure Scanner: 

  • To open Scanners and Cameras, click Start, click Control Panel, and then click Scanners and Cameras. It displays already installed scanner. Select “add device” and click next in the next


  • Select the manufacture and model if it available. Otherwise select “Have disk.”

  •  The next window asks the driver i.e manufactures installation disk. Click browse.
 

  • Locate the driver file and click open. 
  • Then it will install the driver for the scanner


Thursday, 17 October 2024

Experiment -14 :- Scanning Using Automatic Document Feeder (ADF)

AIM :- Using an Automatic Document Feeder (ADF) on a scanner can streamline the scanning process, especially for multi-page documents. Here’s a practical guide to using a scanner with an ADF:


Practical Steps for Scanning Using an ADF

Step 1: Prepare Your Documents

  1. Organize Your Pages:

    • Gather the documents you want to scan. Make sure they are free of staples, paper clips, or any other items that might cause jams.
  2. Check Document Size:

    • Ensure your documents fit the ADF specifications (usually letter, legal, or A4 size).

Step 2: Load Documents into the ADF

  1. Adjust the Guides:

    • Open the ADF tray and adjust the paper guides to fit the width of your documents. The guides should be snug but not too tight.
  2. Load the Documents:

    • Place the documents face up in the ADF tray, ensuring they are aligned properly. The first page should be on the top.

Step 3: Configure Scanner Settings

  1. Open Scanning Software:

    • Launch the scanning application on your computer (this could be the manufacturer’s software, Windows Fax and Scan, or another application).
  2. Select ADF as the Source:

    • In the software, choose the ADF option for scanning. This setting tells the scanner to use the automatic feeder instead of the flatbed.
  3. Set Scan Preferences:

    • Adjust settings such as resolution (DPI), color mode (color, grayscale, or black and white), file format (PDF, JPEG, etc.), and destination folder.

Step 4: Start the Scanning Process

  1. Preview the Scan (optional):

    • If your software allows, perform a preview scan to ensure everything is set up correctly.
  2. Initiate Scanning:

    • Click the scan button in the software to start the scanning process. The ADF will automatically feed the pages one at a time into the scanner.
  3. Monitor the Process:

    • Watch for any error messages or paper jams. If a jam occurs, follow the manufacturer’s instructions to clear it.

Step 5: Save and Review Scans

  1. Finish Scanning:

    • Once scanning is complete, the software will prompt you to save the files. Choose a location and file name for the scanned documents.
  2. Review the Scans:

    • Open the scanned files to check for quality and completeness. Make sure all pages were scanned correctly and are legible.

Step 6: Clean Up

  1. Remove Documents:

    • Take any remaining documents from the ADF and store them properly.
  2. Close the ADF:

    • Close the ADF cover to protect the scanner’s interior from dust.

Troubleshooting Tips

  • Paper Jams: If the ADF jams, gently remove the jammed paper following the scanner’s guidelines. Avoid pulling too hard to prevent damage.
  • Misfeeds: If pages don’t feed correctly, check for crumpled edges or remove a few pages to ensure the stack isn’t too thick.
  • Quality Issues: If scans are unclear, check the scanner’s glass for dirt or smudges, and clean it if necessary.

Using an ADF can significantly improve efficiency when scanning multiple pages, making it an essential feature for office and home use.

EXPERIMENT - 15 :- HOW TO INSTALL BARCODE SCANNER

Installing a scanner on a computer involves several steps, which can vary slightly depending on the scanner model and the operating system you're using. Here’s a general step-by-step guide:


Step 1: Prepare the Scanner

  1. Unbox the Scanner:

    • Remove the scanner from its packaging and ensure you have all the necessary components, including power cords, USB cables, and installation CDs (if provided).
  2. Connect the Power:

    • Plug the scanner into an electrical outlet and turn it on.

Step 2: Connect the Scanner to the Computer

  1. USB Connection:

    • Use a USB cable to connect the scanner directly to your computer. Plug one end into the scanner and the other into a USB port on your computer.

    OR

  2. Wireless Connection (if applicable):

    • If your scanner is wireless, follow the manufacturer’s instructions to connect it to your Wi-Fi network. This usually involves using the scanner's control panel to select your Wi-Fi network and entering the password.

Step 3: Install the Scanner Software

  1. Using Installation CD (if available):

    • Insert the installation CD that came with the scanner into your computer’s CD/DVD drive.
    • Follow the on-screen instructions to install the software.
  2. Downloading Drivers:

    • If you don’t have a CD or the scanner doesn’t require one, go to the manufacturer’s website.
    • Locate the support or downloads section and find the drivers/software for your specific scanner model.
    • Download the latest drivers compatible with your operating system (Windows or macOS).

Step 4: Complete the Installation

  1. Run the Installer:

    • Open the downloaded file or the installation program from the CD.
    • Follow the on-screen prompts to install the software. This may involve accepting terms and conditions and selecting installation options.
  2. Restart the Computer (if prompted):

    • Some installations may require you to restart your computer to complete the setup.

Step 5: Test the Scanner

  1. Open the Scanning Software:

    • After installation, open the scanning software that was installed (this may be a specific program from the manufacturer or a general application like Windows Fax and Scan or Preview on macOS).
  2. Perform a Test Scan:

    • Place a document or image in the scanner.
    • Use the software to select the scan settings (resolution, color mode, etc.) and initiate a scan.
    • Check that the scanned image appears on your computer as expected.

Troubleshooting Tips

  • Scanner Not Detected: If your computer doesn’t recognize the scanner, double-check the connections, ensure the scanner is powered on, and try reinstalling the drivers.
  • Software Issues: Ensure you have the latest version of the software from the manufacturer’s website.
  • Firewall/Antivirus Conflicts: Sometimes, security software can interfere with the scanner's operation; ensure it’s configured to allow the scanner software.

By following these steps, you should be able to successfully install and use your scanner on your computer!

Theory - 19 :- How Barcode Scanners Work

Barcode Scanner

A barcode scanner is a device that reads barcodes—those patterns of lines and spaces found on products, tickets, and various items. Here's how it works, along with an example:


How Barcode Scanners Work

  1. Scanning Process

    • Light Source: The scanner emits a light (usually a laser or LED) that illuminates the barcode.
    • Reflection: The light reflects off the barcode and returns to the scanner. The dark bars absorb light, while the spaces reflect it.
  2. Sensor Detection

    • The scanner has a sensor (often a photodiode) that detects the reflected light. It converts the light patterns into an electrical signal.
  3. Decoding

    • The scanner's internal software interprets the electrical signal into a series of binary numbers (1s and 0s) that represent the barcode's data.
    • Each barcode has a specific format (e.g., UPC, QR code), and the scanner recognizes which format is being read.
  4. Outputting Data

    • The decoded information (such as product ID or price) is sent to a connected device, like a computer or point-of-sale (POS) system.

Example: Scanning a Product at a Checkout

  1. Item Selection: A cashier picks up a product with a barcode on its packaging (e.g., a cereal box).

  2. Scanning: The cashier passes the scanner over the barcode. The laser light reads the barcode pattern.

  3. Data Conversion: The scanner detects the variations in light reflected from the barcode, converts it to an electrical signal, and decodes it.

  4. Information Retrieval: The scanned data is sent to the POS system, which looks up the product in its database to retrieve the item name, price, and inventory status.

  5. Transaction Completion: The system displays the product details and adds the price to the total, allowing the cashier to complete the transaction.

Key Benefits

  • Speed: Barcode scanning is much faster than manual entry.
  • Accuracy: Reduces human error in data entry.
  • Efficiency: Streamlines inventory management and sales processes.

Overall, barcode scanners are essential tools in retail, logistics, healthcare, and many other industries, enhancing operational efficiency and accuracy.

Theory - 14 :- Line Printer

 Line Printer 

A line printer is a type of high-speed printer that prints one line of text at a time, as opposed to printing one character at a time like traditional dot-matrix printers. Line printers are commonly used in environments where bulk printing is needed, such as in data centers, for printing reports, and in industrial settings.

Key Features

  • Speed: Line printers are capable of producing large volumes of printed output quickly.
  • Mechanism: They often use a band or chain of characters that rotate to strike an ink ribbon against paper.
  • Output Quality: While generally lower than laser printers, line printers are sufficient for text-based documents.

Types of Line Printers

  1. Drum Printer: Uses a cylindrical drum with characters arranged around it.
  2. Chain Printer: Uses a chain of characters that moves horizontally.
  3. Band Printer: Utilizes a ribbon of characters on a flexible band.

Diagram of a Line Printer

Here’s a simplified diagram to illustrate how a line printer works:


Working Principle

  1. Character Selection: The printer selects the characters that need to be printed for a specific line.
  2. Impact Printing: The selected characters are brought into contact with an ink ribbon and paper.
  3. Feed Mechanism: After printing a line, the paper is fed down for the next line, and the process repeats.

Applications

  • Batch Printing: Ideal for printing invoices, reports, and labels.
  • Industrial Use: Frequently used in manufacturing for printing on various materials.

Conclusion

Line printers are efficient for high-volume, text-based printing tasks, making them a valuable tool in various industries despite the advancements in printing technology.

Monday, 14 October 2024

Experiment - 12 :- Troubleshooting for Basic Printers

AIM :- Troubleshooting  for Basic Printers    


1. Refer the User Manual

  • Read the manual thoroughly and follow the steps to connect the printer to PC 
    • In general, the printers are having connectivity with parallel port of PC and nowadays the USB connectivity is also available with the printer. 
    • Also we can connect the printers in the network if they are coming with RJ 45 connectors. 

2. Check the manufacturer's web site 

  • Suppose if you have missed somewhere the user manual of printer, you may access the concerned manufacturer’s web site for the details of the printer. 

3. Check the plug at Power outlet 

  • Ensure the printer is plugged into a live outlet. If it is plugged into a surge protector, make sure it is on.

4. What if the power is on but there is no print out? 

  • Make sure that the power is on and there is no error lights (LEDs) lit.
  •  f there are error lights, refer to the user manual/manufacturer's web site. 
  • You should hear the print mechanism initialize when power is applied and most printers have at least one light which will be illuminated when it is on. 

5. Check whether it is online or not. 

  • Online means, most of the printers are connected directly to the PC. Please check whether the connectivity between PC and printer as per user manual or not. 

6. In case it is beeping , try to find out the reason for it. 

  • Most printers will beep once or twice during or after initialization. If it beeps more than that or beeps constantly, it is an indication that something is wrong. Most of the printers will beep when out of paper or out of ink.

7. Check weather you are able to give a test-print. 

  • Most printers have a built-in diagnostics program which can be very useful for troubleshooting problems and test-printing without a computer. They are usually initiated by pressing a button or two while turning on the printer. Check your user manual. 
  • If the printer test-prints OK, you don’t have any problem with print mechanism of the printer. Then you may check the connectivity of the printer. 
8. Check whether it has ink or toner
  • Check whether the ink or toner of the printer is there . 
  • In case it is there check if it is properly filled or not. 
  • Check if the heads of the toners are clean or not. One must have to clean them periodically. 
9. Check whether it has enough paper for printing purpose 
  • Be sure the paper is installed correctly and there is enough of it. Most printers have a paper-out detector. On most dot matrix printers it is a photo diode. If form-fed paper is not aligned correctly (usually on the left side) the diode won't see it. 
10. Check whether the printer is jammed? 
  • Paper jams are frequently the reason for malfunction in many printers. Always read the manual on how to clear a jam. 
    • Don't be in a rush with your printer as you can easily damage a printer or even get hurt, if you do not follow instructions in the user manual. 
    • Don't move a print head unless the instructions direct it. You can damage the belt, etc.
  • Turn the power off & unplug it, before you start doing something . 
    • Laser printers have some very fine wires to remove static charges from the paper near the fuser mechanism which will break if you are not very careful. Also, the fuser itself can be very hot (it fuses/melts toner to the paper). 
11. Check whether the RAM is sufficient 
  • The printer memory could be full and not getting prints and prints may be stuck in print queue. Turn-off the printer, wait a few seconds and turn it back on. 
12. Check whether the software (print drivers) installed or not 

  • We have to check the correct device drivers (software) of the printer installed in OS. 
  • Refer installation steps in windows, DOS, Linux in to user manual or vendors web site 

13. Check the printer connectivity with right port in BIOS settings 

  • Check Cable connectivity with printers Check the following points
    • The pins of DB25 connector are properly connected or not 
    • Check the various connectivity’s of either side (e.g USB, DB25 etc) 
    • Many printers now require an IEEE 1284 and Bi-Directional. USB cables shouldn’t be longer than 15 feet. 
    • Check for bent pins. Try another cable. 
  • Is there something else connected to the printer port?
    •  Disconnect it and uninstall the device drivers for it. 

Tuesday, 8 October 2024

EXPERIMENT - 11 :- Diagnostic Tools for Printer Fault Finding

AIM -  Diagnostic Tools for Printer Fault Finding


Printer fault finding can be a challenging task, but with the right diagnostic tools, you can quickly identify and resolve issues. Here are some common diagnostic tools used for printer fault finding:

1. Printer Self-Test Page

Most printers have a self-test page that can be printed to diagnose issues. This page typically includes a print quality test, ink or toner level indicators, and other diagnostic information.

2. Printer Status Lights

Many printers have status lights that indicate the printer's status, such as paper jams, low ink or toner, or other errors. Understanding the meaning of these lights can help you diagnose issues quickly.

3. Printer Software or Driver

Printer software or drivers often include diagnostic tools, such as print quality tests, nozzle cleaning tools, and alignment tests.

4. Event Logs

Event logs can provide detailed information about printer errors, including the type of error, the time it occurred, and any error codes.

5. Printer Maintenance Utilities

Some printers come with maintenance utilities that can help diagnose and resolve issues, such as cleaning the print head or aligning the printhead.

6. Multimeter

A multimeter can be used to measure the voltage and current of the printer's power supply, which can help diagnose issues with the printer's electrical system.

7. Logic Analyzer

A logic analyzer can be used to diagnose issues with the printer's communication protocols, such as USB or Ethernet.

8. Printer Repair Manuals

Printer repair manuals can provide detailed information about the printer's internal components, troubleshooting procedures, and repair techniques.

9. Online Resources

Online resources, such as forums, knowledge bases, and technical support websites, can provide valuable information and troubleshooting guides for specific printer models.

10. Diagnostic Software

Diagnostic software, such as Printer Diagnostics or Print Doctor, can provide detailed information about the printer's status, including print quality, ink or toner levels, and error codes.