Booting Process
Booting
is the process of switching on a computer. Two types of booting. Six steps of
the booting process are BIOS and Setup Program, The Power-On-Self-Test (POST),
The Operating System Loads, System Configuration, System Utility Loads, and
Users Authentication.
Types of Booting
Booting
is the process of switching on the computer and starting the operating system.
When a computer is switched on, The boot process loads the operating system
into the main memory (RAM) installed inside it. Types of computer booting are
Cold Booting And Warm Booting.
- Cold Boot: when the user switches on a computer after it has been powered off completely,
- Warm Boot:
when the user restarts the computer.
Cold Booting In Computer
Cold booting is the process of booting a system that has been turned off. This is usually done by pressing the power button on the computer. Cold Startup does Power on Self-Testing (POST).
This is a series of system checks at the beginning of the boot queue. In other words, it checks that all the requirements are met and that the hardware is working properly before the operating system starts.
When repairing the system, the user will be prompted to turn off the system completely. Then a cold boot is done. It removes all temporary data from the system and removes issues that could affect the operation of the system.
Warm Booting
A warm booting is a process of restarting the system. It can be configured with the operating system. In Windows, the user can start hot booting by selecting the Restart option from the Start menu. On the Mac, the user can begin to warm booting by selecting Reboot from the Apple menu.
A warm boot is usually done by a cold start because users will leave the system in standby mode when it is not running. The warm-up process has no power source for automatic control but does the rest of the boot sequence. It loads all the installed system files before restarting the system.
Cold and Warm Booting are two different types of booting in computers.
Differences Between Cold Booting And Warm
Booting
Cold booting is the
process of starting a computer from a power outage and operating normally. A
warm booting is a process of restarting an already running system without
shutting it down completely. Therefore, it explains the differences between
cold booting and warm booting.
- During a cold start by pressing the power button on the computer, the operating system starts immediately.
- A cold boot is also known as a hard start while a warm boot is also called a soft start.
- A cold boot resets the system completely rather than a hot boot. This is another difference between a cold boot and a warm boot.
- The cold boot has an
automatic control function (POST), while the hot boot has no self-regulating
function (POST).
- A warm boot is more common than a cold boot.
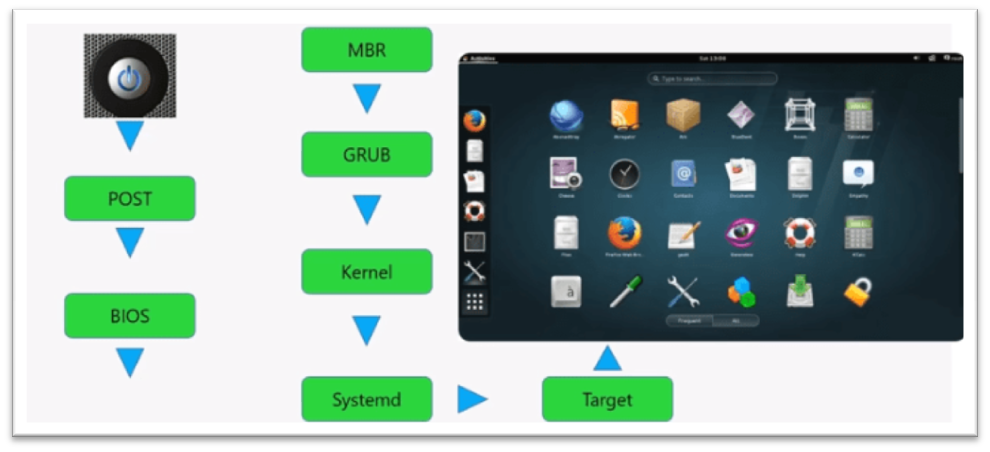
Booting Process With Diagram
Diagram Representation
Of Boot process
When the booting process takes place, it copies the kernel and important instructions of an operating system from hard disk to main memory (RAM). The kernel is the most important part of the operating system that manages memory and devices, maintains the computer clock, starts applications.
It assigns compute resources like devices, programs, data, and information also.
The kernel also remains in memory permanently
when the computer starts.
Steps In the Booting Process
Booting is the process of switching on the computer and starting the operating system. 6 steps in the booting process are BIOS and Setup Program, The Power-On-Self-Test (POST), The Operating System Loads, System Configuration, System Utility Loads, and Users Authentication.
1. BIOS and Setup Program
2. The Power-On-Self-Test (POST)
3. The Operating System (OS) Loads
4. System Configuration
5. System Utility Loads
6. Users Authentication
Booting Process Of Computer Step By Step
Here is the explanation of the booting process steps for more clarity.
Step 1: BIOS and Setup Program
- ROM (read-only memory): it is a permanent and unchanging memory also
- BIOS (basic input/output system): the part of the system software that
includes the instructions that the computer uses to accept input and output
- Load: to transfer from
a storage device to memory. The ROM loads BIOS into the computer’s
memory
- Setup program: a special program containing settings to control hardware. Furthermore, the program can only be accessed while the BIOS information is visible.
Step 2: The Power-On-Self-Test (POST)
- POST (Power-On Self-Test): a series of tests conducted on the computer’s main
memory, input/output devices, disk drives, and the hard disk.
- BIOS conduct Power-On-Self-Test to check the input/ output system for operability.
- The computer will produce a beeping sound if any problem occurs. An error message will also appear on the monitor
Step 3: The Operating System (OS) Loads
BIOS searches for the operating system.
- Setting in CMOS: complementary metal oxide semiconductor determines where to
look for the operating system.
- In this step, the operating system’s kernel is also loaded into the computer’s memory.
- The operating system takes control of the computer and begins loading system configuration information.
Step 4: System Configuration
- Registry: a database to store information about peripherals and software
- Peripheral: a device connected to a computer
- Drive: a utility program that makes peripheral devices function properly
- The operating system’s registry configures the system.
- In this step, drivers are also loaded into memory.
Step 5: System Utility Loads
- System utilities are loaded into memory.
- Volume control
- Antivirus software
- PC card unplugging utility
Step 6: Users Authentication
- Authentication or user login occurs
- Username
- Password
The above-mentioned steps play an important role in booting a
computer. After all this process, the user interface starts, enabling user
interaction with the computer and its programs also.


Post a Comment
If you have any doubts, please let me know